Stone walls add character and charm to any property, but they require regular maintenance to withstand the elements. Over time, mortar can crumble, stones can loosen, and the entire structure can become unstable. Fortunately, with the right tools and techniques, you can tackle many stone wall repair projects yourself.
This guide provides a step-by-step approach to stone wall repair, covering everything from assessing the damage to curing the new mortar. You’ll learn how to address common issues like mortar repair, stone replacement, and wall stabilization, ensuring your stone wall stands strong for years to come.
Before you begin any stone wall repair, it’s important to understand the extent of the damage. Proper assessment will help you determine the necessary repairs and prevent further deterioration.
Assessing the Damage to Your Stone Wall
Start by visually inspecting the entire wall, looking for cracks, loose stones, and crumbling mortar. Pay close attention to areas where water may be pooling or running down the wall, as these are often the most vulnerable spots.
Check for any bulging or leaning sections, which could indicate structural instability. Use a level to determine if the wall is still plumb or if it has shifted over time.
Examine the mortar joints closely, noting any areas where the mortar is missing, cracked, or soft. Use a small tool, like a screwdriver or awl, to gently probe the mortar joints and assess their condition.
Look for signs of water damage, such as efflorescence (a white, powdery substance on the surface of the stone) or staining. These indicate that water is penetrating the wall and potentially causing further damage from freeze-thaw cycles.
A thorough assessment is the bedrock of a successful repair. Don’t rush this step; take your time and document everything you find.
Photographing the damage can be extremely helpful for future reference. These photos can also be useful when consulting with professionals or sourcing matching stones.
Pay special attention to the base of the wall, as this area is often exposed to the most moisture and ground movement. Check for any signs of erosion or undermining of the foundation.
Also, inspect the top of the wall for any missing or damaged coping stones. Coping stones protect the wall from water penetration and can prevent significant damage if properly maintained.
Consider the age of the wall and the type of stone used in its construction. Older walls may be more susceptible to certain types of damage, and different types of stone may require different repair techniques.
Finally, think about the surrounding environment and how it might be affecting the wall. Are there trees nearby that are dropping leaves or debris onto the wall? Is the wall exposed to harsh weather conditions?
Gathering the Necessary Tools and Materials
Having the right tools and materials on hand will make the stone wall repair process much smoother and more efficient. Here’s a list of essential items you’ll need.
First, you’ll need a cold chisel and hammer for removing old mortar and shaping stones. A masonry saw or grinder with a diamond blade is helpful for cutting stones to size.
A tuckpointing trowel, margin trowel, and hawk are essential for applying new mortar. You’ll also need a bucket or mortar tub for mixing mortar and a stiff brush for cleaning surfaces.
For safety, wear safety glasses, gloves, and a dust mask. You may also need scaffolding or a ladder to reach higher sections of the wall.
Selecting the correct mortar is crucial for the longevity of your repair. Use a mortar mix that is compatible with the existing mortar and the type of stone used in the wall.
Lime-based mortars are often preferred for older stone walls, as they are more flexible and breathable than modern cement-based mortars. This allows the wall to breathe and prevents moisture from becoming trapped inside.
Consider renting or borrowing specialized tools if you don’t already own them. A power mixer can save you a lot of time and effort when mixing large batches of mortar.
You’ll also need a supply of clean water for mixing the mortar and dampening the stones. Keep a hose or watering can nearby for easy access.
Don’t forget about shims or small pieces of stone that can be used to hold stones in place while the mortar dries. These can be especially helpful when replacing larger stones.
A pointing gun can be useful for injecting mortar into narrow joints. This tool can help you achieve a more professional-looking finish.
Removing Damaged Mortar and Loose Stones
Before you can begin repairing your stone wall, you’ll need to remove any damaged mortar and loose stones. This ensures that the new mortar will bond properly and create a strong, lasting repair.
Start by using a cold chisel and hammer to carefully chip away at the old mortar surrounding the damaged areas. Be careful not to damage the surrounding stones.
| Tool | Use | Safety Notes |
|---|---|---|
| Cold Chisel & Hammer | Removing old mortar | Wear safety glasses, avoid hitting stones directly |
| Tuckpointing Trowel | Applying new mortar | Clean regularly to prevent mortar buildup |
| Masonry Saw | Cutting stones to size | Use with water to reduce dust, wear ear protection |
| Wire Brush | Cleaning stone surfaces | Use appropriate stiffness for stone type to avoid damage |
Once the mortar is removed, carefully remove any loose stones. If a stone is stuck, gently tap it with a hammer and chisel to loosen it.
Work slowly and methodically to avoid damaging the surrounding stones. It’s better to remove the mortar in small pieces than to try to force it out all at once.
Use a variety of chisel sizes to access different areas of the mortar joints. A smaller chisel can be helpful for removing mortar from tight spaces.
Be sure to remove all loose and crumbling mortar, even if it means removing more than you initially anticipated. Any remaining damaged mortar will compromise the bond of the new mortar.
Clean the exposed stone surfaces thoroughly with a stiff brush to remove any remaining debris. This will help the new mortar adhere properly.
Consider using a vacuum cleaner to remove dust and small particles from the mortar joints. This will create a cleaner surface for the new mortar to bond to.
Dispose of the old mortar properly. It may contain harmful materials, so avoid dumping it in your garden or throwing it in the trash.
Mixing and Applying New Mortar
Mixing and applying mortar correctly is crucial for a durable stone wall repair. Use a pre-mixed mortar specifically designed for stone or masonry work.
Follow the manufacturer’s instructions for mixing the mortar, adding water gradually until you achieve a thick, pasty consistency. Avoid adding too much water, as this can weaken the mortar.
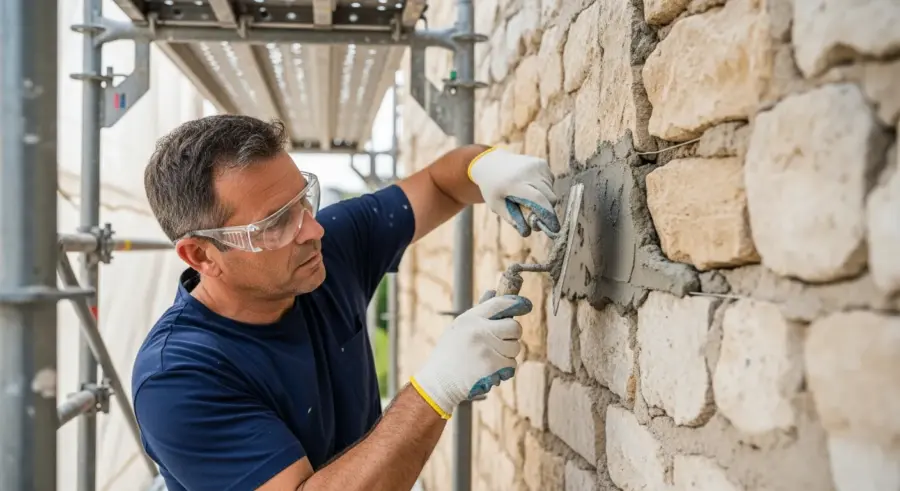
Before applying the mortar, dampen the surrounding stones with water to improve adhesion. Use a tuckpointing trowel to carefully pack the mortar into the joints, making sure to fill all voids.
Once the joints are filled, use the trowel to smooth and shape the mortar to match the existing joints. Remove any excess mortar from the surface of the stones with a damp sponge.
Mix the mortar in small batches to avoid it drying out before you can use it. This is especially important in hot weather.
Use a hawk to hold a small amount of mortar while you’re working. This will make it easier to apply the mortar to the joints.
Pack the mortar firmly into the joints to ensure that it fills all voids and creates a strong bond. Use the tuckpointing trowel to compress the mortar and remove any air pockets.
Pay attention to the tooling of the mortar joints. The tooling is the shape and texture of the mortar surface. Try to match the existing tooling as closely as possible.
There are several different types of mortar tooling, including concave, V-shaped, and flush. Each type of tooling creates a different look and has different performance characteristics.
Clean your tools regularly to prevent mortar from hardening on them. This will make them easier to use and extend their lifespan.
Replacing or Repairing Damaged Stones
If any of the stones in your wall are cracked, broken, or severely weathered, you’ll need to replace or repair them. Whenever possible, try to source replacement stones that match the existing ones in terms of color, size, and texture.
If you can’t find a perfect match, consider using stones from a less visible area of the wall to make the repairs, and then replace those stones with the best available match.
- Source matching stones
- Clean the replacement stone
- Apply mortar to the back of the stone
- Carefully insert the stone into the wall
- Remove excess mortar
For minor cracks or chips, you can use a stone repair epoxy to fill the damaged areas. Follow the manufacturer’s instructions for mixing and applying the epoxy, and then blend it with the surrounding stone using a small brush or sponge.
When sourcing replacement stones, consider checking with local quarries or stone yards. They may be able to provide you with stones that are a good match for your existing wall.
If you’re unable to find a perfect match, you can try to blend the replacement stones with the existing stones by using a stain or dye. This can help to make the repairs less noticeable.
Before installing a replacement stone, make sure that the surrounding area is clean and free of debris. This will help the new stone to bond properly.
Apply a generous amount of mortar to the back of the replacement stone and carefully insert it into the wall. Use shims to hold the stone in place while the mortar dries.
If you’re using a stone repair epoxy, be sure to follow the manufacturer’s instructions carefully. Some epoxies require special tools or techniques.
Allow the mortar or epoxy to cure completely before removing the shims or applying any weight to the repaired area. This will ensure that the repairs are strong and durable.
Curing and Protecting Your Stone Wall
Proper curing is essential for ensuring the strength and durability of your stone wall repair. The mortar needs to hydrate slowly to reach its full strength.
Keep the repaired area damp for at least 3-7 days by misting it with water regularly, especially during hot or dry weather. This prevents the mortar from drying out too quickly and cracking.
Protect the repaired area from direct sunlight, wind, and rain by covering it with a tarp or plastic sheeting. This helps to maintain a consistent moisture level and prevent damage from the elements.
Once the mortar has fully cured, consider applying a breathable water repellent to the entire wall to protect it from future water damage. Make sure the product is specifically designed for use on stone and masonry.
The curing process is often overlooked, but it’s crucial for achieving a strong and lasting repair. Mortar that dries too quickly will be weak and brittle.
In hot, dry weather, you may need to mist the repaired area several times a day to keep it damp. Consider using a soaker hose to provide a continuous supply of moisture.
If you’re using plastic sheeting to protect the repaired area, make sure that it’s properly ventilated to prevent condensation from forming. Condensation can damage the mortar and promote the growth of mold and mildew.
When applying a water repellent, be sure to follow the manufacturer’s instructions carefully. Apply the repellent evenly and allow it to dry completely before exposing the wall to water.
Choose a water repellent that is specifically designed for use on stone and masonry. Avoid using products that are designed for other surfaces, as they may damage the stone or mortar.
Reapply the water repellent every few years to maintain its effectiveness. This will help to protect your stone wall from future water damage.
Addressing Wall Stabilization Issues
If your stone wall is leaning or bulging, it may require additional stabilization measures. This could involve installing tie rods or anchors to secure the wall to the surrounding structure.
Tie rods are long metal rods that are inserted through the wall and anchored to a stable structure on the other side. They help to pull the wall back into alignment and prevent further movement.
Anchors are similar to tie rods, but they are typically used to secure the wall to the ground or to an adjacent building. They are installed by drilling into the wall and inserting a metal anchor that is then secured to the foundation or other stable structure.
For more extensive stabilization projects, it’s best to consult with a qualified structural engineer or stone masonry contractor. They can assess the situation and recommend the most appropriate solution for your specific wall.
Before considering tie rods or anchors, investigate the underlying cause of the wall’s instability. Is it due to poor drainage, unstable soil, or structural damage?
Addressing the underlying cause is essential for preventing future problems. Simply installing tie rods or anchors may not be enough to solve the problem if the underlying cause is not addressed.
A structural engineer can assess the wall’s stability and recommend the most appropriate stabilization method. They can also design the tie rods or anchors to ensure that they are strong enough to support the wall.
A stone masonry contractor can install the tie rods or anchors and repair any damage to the wall. They have the experience and expertise to ensure that the work is done correctly.
When installing tie rods or anchors, it’s important to use high-quality materials that are resistant to corrosion. This will help to ensure that the stabilization measures are effective for many years to come.
Regularly inspect the tie rods or anchors to ensure that they are still in good condition. Replace any damaged or corroded components as soon as possible.
Maintaining Your Stone Wall for Longevity
Once you’ve completed your stone wall repair, it’s important to take steps to maintain it and prevent future damage. Regularly inspect the wall for any signs of new cracks, loose stones, or crumbling mortar.
Keep vegetation away from the wall, as roots can penetrate the mortar joints and cause damage. Trim any trees or shrubs that are growing too close to the wall, and remove any vines or other climbing plants.
Clean the wall periodically to remove dirt, moss, and other debris. Use a soft brush and a mild detergent solution, and avoid using harsh chemicals or pressure washers, which can damage the stone and mortar.
Address any minor repairs promptly to prevent them from turning into larger, more costly problems. By taking good care of your stone wall, you can ensure that it remains a beautiful and functional part of your property for many years to come.
Regular inspections are key to identifying potential problems early on. Make it a habit to walk around your stone wall at least once a year and look for any signs of damage.
Pay special attention to areas that are exposed to the most moisture or sunlight. These areas are more likely to experience damage.
Remove any moss or algae that is growing on the wall. Moss and algae can trap moisture and damage the stone and mortar.
Apply a sealant to the wall every few years to protect it from water damage. Choose a sealant that is specifically designed for use on stone and masonry.
Consider installing a drainage system to divert water away from the wall. This can help to prevent water damage and erosion.
If you live in an area with harsh winters, consider covering the wall with a tarp or plastic sheeting to protect it from freeze-thaw damage. This is especially important for older walls that are more susceptible to damage.
Conclusion
Repairing a stone wall is a rewarding project that can enhance the beauty and value of your property. By following these steps and taking the time to do the job right, you can restore your stone wall to its former glory and ensure its longevity.
Remember to always prioritize safety and consult with a professional if you’re unsure about any aspect of the repair process. With a little effort and attention to detail, you can successfully complete your stone wall repair and enjoy the timeless appeal of your stone structure for years to come.
Stone walls, with their timeless elegance, are worth the effort of proper repair and maintenance. The techniques outlined in this guide provide a solid foundation for tackling many common issues.
However, remember that every stone wall is unique, and some repairs may require specialized knowledge or skills. Don’t hesitate to seek professional help when needed.
By investing in the upkeep of your stone wall, you’re not only preserving its beauty but also protecting its structural integrity for generations to come. Enjoy the satisfaction of a job well done and the enduring charm of your restored stone wall.