Dry stone wall construction is an ancient and beautiful craft. It involves building walls using only stones, without any mortar to bind them together.
This method of walling has been used for centuries in various parts of the world, creating durable and visually appealing structures. Understanding the fundamentals of dry stone walling is essential for anyone interested in preserving this traditional craft or incorporating it into their landscape design.
Whether you’re a seasoned stone mason or a complete beginner, this guide will provide you with the knowledge and techniques needed for successful dry stone wall construction. We will cover everything from stone selection to wall maintenance, ensuring your wall stands the test of time.
Understanding the Principles of Dry Stone Walling
The core principle behind dry stone wall construction is friction. By carefully selecting and arranging stones, you create a structure that relies on the weight and interlocking shapes of the stones to maintain stability.
This is achieved through batter, hearting, and through stones. Batter refers to the inward slope of the wall as it rises, which helps to distribute the weight evenly.
Hearting involves filling the core of the wall with smaller stones to create a solid mass. Through stones, also known as bond stones, extend from one face of the wall to the other, tying the two sides together.
Understanding these principles is key to building a wall that is not only aesthetically pleasing but also structurally sound. A well-built dry stone wall can last for generations, withstanding the elements and requiring minimal maintenance.
The absence of mortar allows for flexibility and movement within the wall. This flexibility is crucial for absorbing ground movement and preventing cracking, especially in areas prone to earthquakes or frost heave.
Dry stone walls are also environmentally friendly, as they don’t require the use of cement, which is a major contributor to carbon emissions. The natural materials used in construction blend seamlessly with the surrounding landscape, creating a harmonious and sustainable structure.
Furthermore, the spaces between the stones provide habitat for various insects and small animals. These walls support biodiversity and contribute to a healthy ecosystem.
The batter, or inward slope, is not just about distributing weight; it also helps to deflect rainwater away from the core of the wall. This prevents water from saturating the hearting and weakening the structure over time.
Through stones are essential for preventing the wall from separating into two distinct faces. They act as anchors, tying the front and back of the wall together and ensuring its overall stability.
Proper hearting is crucial for filling voids and preventing movement within the wall. The smaller stones used for hearting should be carefully selected and packed tightly to create a solid and cohesive mass.
Ignoring any of these principles can lead to a wall that is unstable and prone to collapse. Careful planning and attention to detail are essential for successful dry stone wall construction.
The art of dry stone walling lies in understanding how these principles interact and applying them effectively to create a strong and beautiful structure. It’s a craft that requires patience, skill, and a deep appreciation for the properties of stone.
Selecting the Right Stones for Your Dry Stone Wall
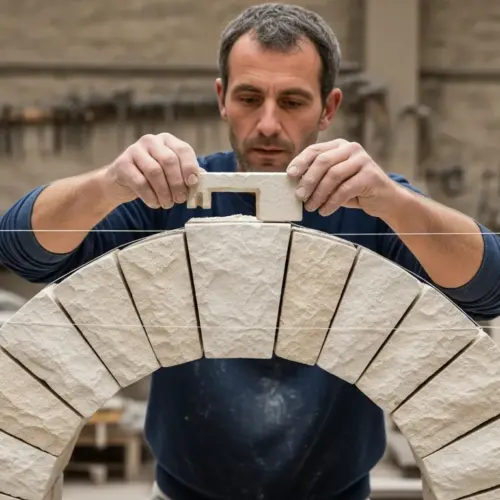
Choosing the right stones is a critical step in dry stone wall construction. The type of stone available will vary depending on your location, but some general guidelines apply.
Ideally, you want stones that are relatively flat, angular, and of varying sizes. Flat stones are easier to stack and create a stable wall face, while angular stones interlock more effectively.
Different sizes allow you to fill gaps and create a more solid structure. Avoid round or heavily weathered stones, as they are more likely to roll or crumble over time.
Consider the color and texture of the stone as well, as these will contribute to the overall aesthetic of your wall. Matching the stone to existing structures or the surrounding landscape can create a cohesive and visually appealing design.
The type of stone will also affect the wall’s durability and resistance to weathering. Granite, for example, is a very hard and durable stone that is ideal for walls in harsh climates.
Limestone is a softer stone that is easier to work with but may be more susceptible to erosion over time. Sandstone is another popular choice, offering a good balance of durability and workability.
When selecting stones, pay attention to their grain and cleavage. Stones that split easily along a natural plane are easier to shape and stack.
Avoid stones with cracks or other weaknesses, as these can compromise the wall’s structural integrity. It’s also important to consider the size and weight of the stones, especially if you are working alone.
Larger stones can be difficult to lift and maneuver, while smaller stones may not provide enough stability. A good mix of sizes is ideal for creating a strong and visually appealing wall.
The source of your stones can also impact their quality and suitability for dry stone walling. Stones quarried from a reputable source are more likely to be consistent in size, shape, and quality.
Field stones can be a more economical option, but they may require more sorting and shaping. Ultimately, the best stones for your dry stone wall will depend on your budget, the availability of materials, and your personal preferences.
Take your time to carefully select the right stones, and you’ll be rewarded with a wall that is both beautiful and durable.
Preparing the Foundation for Your Wall
A solid foundation is essential for the stability of any dry stone wall. The foundation should be level, well-drained, and wide enough to support the weight of the wall.
Start by excavating the area where the wall will be built, removing any topsoil, vegetation, and loose debris. The depth of the excavation will depend on the size of the wall and the soil conditions, but a minimum of 6 inches is generally recommended.
| Foundation Type | Soil Conditions | Recommended Depth |
|---|---|---|
| Gravel Base | Well-drained soil | 6-8 inches |
| Compacted Stone | Slightly unstable soil | 8-12 inches |
| Concrete Footing | Very unstable soil | 12+ inches |
| Native Soil | Stable soil | 6 inches |
Once the area is excavated, fill it with a layer of gravel or crushed stone to improve drainage. Compact the base material thoroughly using a hand tamper or plate compactor.
The width of the foundation should be at least twice the width of the wall at its base. This provides a stable platform for the wall and helps to distribute the weight evenly over the ground.
For taller walls or walls built on unstable soil, a concrete footing may be necessary. A concrete footing provides a solid and level base for the wall, preventing it from settling or shifting over time.
The concrete footing should be reinforced with steel rebar to increase its strength and durability. When pouring the concrete, be sure to compact it thoroughly to eliminate air pockets and ensure a solid foundation.
Proper drainage is crucial for preventing water from accumulating behind the wall and weakening the foundation. Install drainage pipes or French drains to channel water away from the wall.
The foundation should also be sloped slightly away from the wall to encourage water to drain away. Before building the wall, check the foundation for level using a spirit level or laser level.
Any unevenness in the foundation can cause the wall to lean or become unstable. Make any necessary adjustments to ensure that the foundation is perfectly level before proceeding.
Taking the time to properly prepare the foundation is essential for building a dry stone wall that will last for generations. A solid foundation is the key to a stable and durable wall.
Don’t skimp on this step, as it will save you time and money in the long run.
Laying the Stones and Ensuring Stability
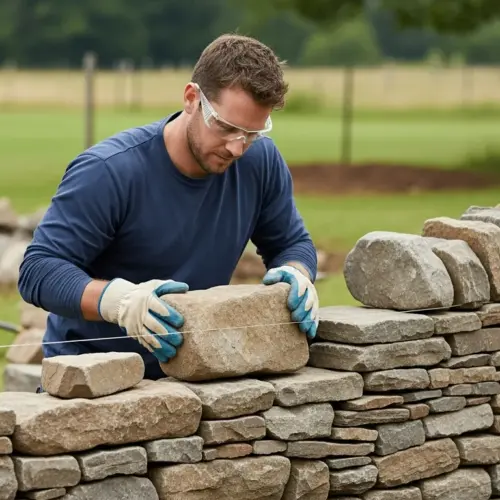
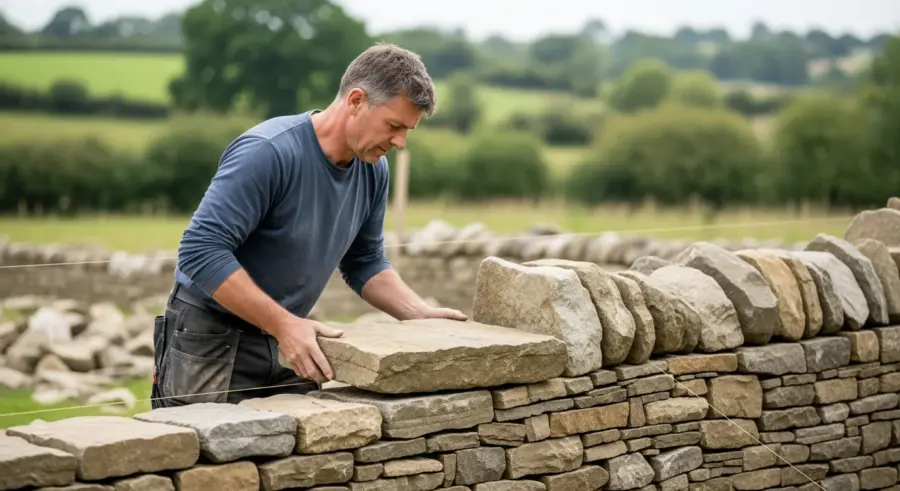
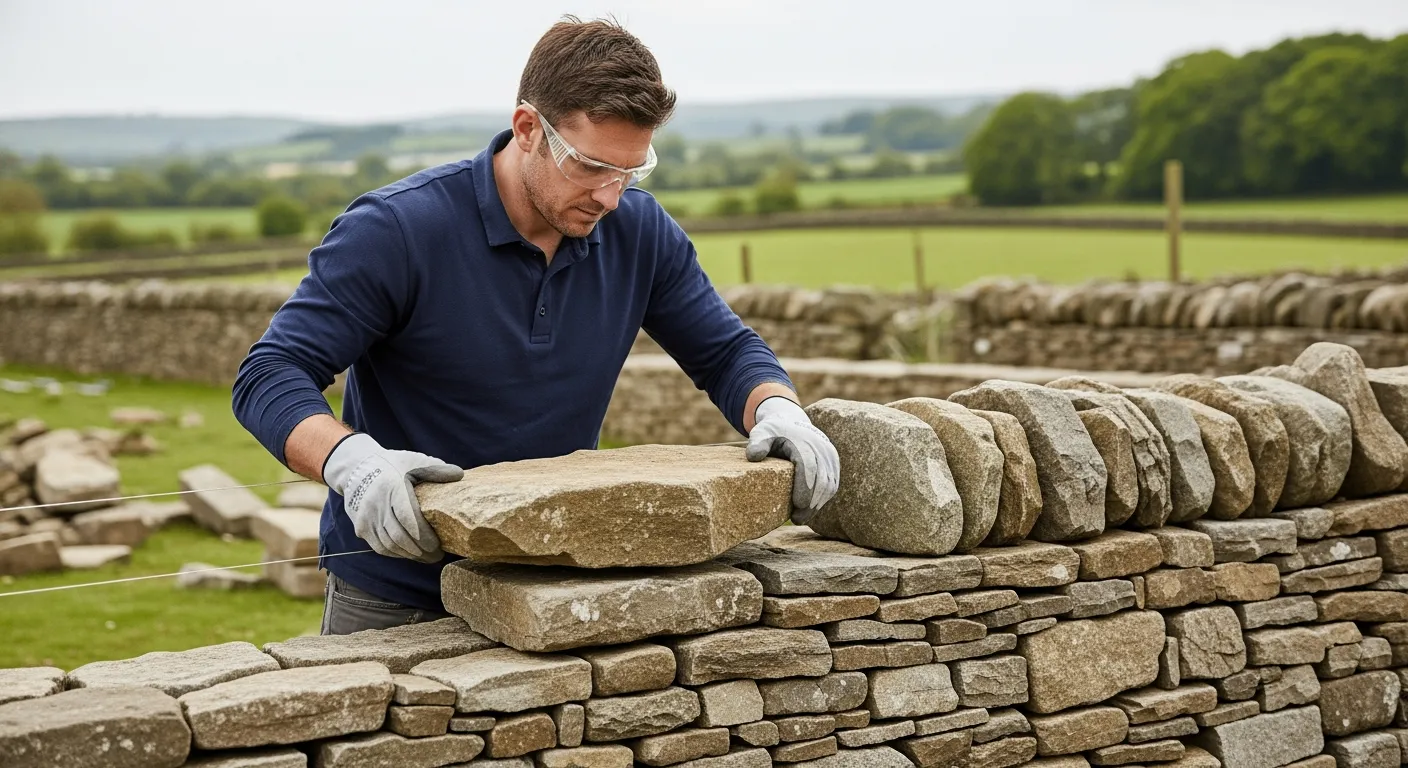
Laying the stones is where the art and skill of dry stone wall construction truly come into play. Start by placing the largest stones at the base of the wall, ensuring they are firmly seated and level.
These base stones will form the foundation course, providing a stable platform for the rest of the wall. As you build each course, maintain the batter by setting the stones slightly further back than the course below.
Fill any gaps between the stones with smaller stones, ensuring that each stone is tightly wedged in place. The hearting should be packed tightly to prevent movement and maintain the wall’s structural integrity.
Regularly incorporate through stones to tie the two faces of the wall together. These stones should extend at least halfway through the wall and be staggered throughout its height.
Continuously check for plumb and level as you work, making adjustments as needed to maintain a straight and stable wall. Remember, the key is to create a structure where each stone is supported by at least three others, distributing the weight evenly.
As you build each course, try to stagger the joints between the stones. This prevents continuous vertical seams, which can weaken the wall.
Overlap the stones in each course to create a more interlocking and stable structure. Use smaller stones to fill any gaps and create a tight fit between the larger stones.
The hearting is not just about filling gaps; it also plays a crucial role in distributing the weight of the wall. Pack the hearting tightly, using a variety of sizes and shapes of stones to create a solid mass.
Through stones are essential for preventing the wall from separating into two distinct faces. Choose through stones that are long and strong, and position them so that they tie the front and back of the wall together effectively.
Use a spirit level to check for plumb and level as you build each course. Make any necessary adjustments to ensure that the wall is straight and stable.
Don’t be afraid to remove and reposition stones if they don’t fit properly or if they compromise the wall’s stability. Patience and attention to detail are key to successful dry stone wall construction.
Remember, each stone should be supported by at least three others, distributing the weight evenly throughout the wall. This principle is crucial for creating a strong and durable structure.
By carefully selecting and placing each stone, you can create a dry stone wall that is both beautiful and structurally sound.
Coping and Finishing Your Dry Stone Wall
The coping is the top layer of stones on your dry stone wall. It serves both a functional and aesthetic purpose, protecting the wall from water damage and adding a finished look.
Select the largest and flattest stones for the coping, ensuring they overhang slightly on both sides of the wall. This overhang helps to shed water away from the wall’s core, preventing erosion and frost damage.
Set the coping stones firmly in place, using smaller stones to wedge them tightly together. Consider the overall appearance of the coping, ensuring it is level and visually appealing.
You can choose to create a uniform coping with stones of similar size and shape, or opt for a more natural look with varying stones. The coping should be securely interlocked.
The coping stones should be carefully selected to provide a durable and weather-resistant finish. Choose stones that are resistant to cracking and erosion.
The overhang of the coping stones is crucial for protecting the wall from water damage. Ensure that the overhang is sufficient to shed water away from the wall’s core.
Use smaller stones to wedge the coping stones tightly together, preventing them from shifting or moving over time. The coping should be level and visually appealing, adding a finished look to the wall.
Consider the overall style of the wall when choosing the coping stones. A uniform coping can create a more formal look, while a more natural coping can complement a rustic design.
The coping stones should be securely interlocked to prevent them from being dislodged by wind or other forces. Use a variety of sizes and shapes of stones to create a tight and stable coping.
The finishing touches can make a big difference in the overall appearance of the wall. Clean up any loose stones or debris around the base of the wall.
Consider adding plants or other decorative elements to enhance the wall’s beauty. A well-coped and finished dry stone wall is a testament to the skill and craftsmanship of the builder.
It’s a structure that will last for generations, adding character and value to your property.
Integrating Your Dry Stone Wall into Landscape Design
A dry stone wall can be a beautiful and functional addition to any landscape design. It can be used to create terraces, define garden beds, or simply add visual interest to your property.
Consider the style and character of your home and surrounding landscape when designing your wall. A rustic, informal wall might be perfect for a country garden, while a more formal, structured wall could complement a modern home.
Incorporate plants into your dry stone wall to soften its appearance and create a more natural look. Creeping plants like thyme or sedum can be planted in the crevices between the stones, adding color and texture.
Larger plants can be placed at the base of the wall to create a layered effect. A dry stone wall can also be used to create a focal point in your garden, drawing the eye and adding visual interest.
The height and length of the wall should be proportionate to the surrounding landscape. A wall that is too tall or too long can overwhelm the space.
Consider the views from different parts of your property when designing the wall. Position the wall to frame desirable views and screen out undesirable ones.
Use the wall to create different levels and terraces in your garden. This can add visual interest and create more usable space.
Incorporate pathways and steps into the wall to create a seamless transition between different areas of your garden. The color and texture of the stone should complement the surrounding landscape.
Choose stones that blend in with the natural environment. Consider adding a water feature to the wall, such as a small waterfall or fountain.
This can add a soothing sound and create a focal point. Use the wall to create a sense of privacy and seclusion in your garden.
Plant trees and shrubs around the wall to create a natural screen. A dry stone wall can be a versatile and beautiful addition to any landscape design.
With careful planning and attention to detail, you can create a wall that enhances the beauty and functionality of your outdoor space.
Maintaining Your Dry Stone Wall
One of the great advantages of dry stone walls is their low maintenance requirements. However, occasional maintenance is still necessary to ensure the wall’s longevity and stability.
Inspect your wall regularly for any signs of movement or damage, such as loose stones or bulging sections. Address any issues promptly to prevent them from worsening.
- Remove any vegetation growing on the wall
- Replace any missing or damaged stones
- Re-pack any loose hearting
- Check for proper drainage
- Monitor for frost damage
If a section of the wall becomes unstable, it may be necessary to dismantle and rebuild it. This is best done by a skilled stone mason, but with careful attention to detail, it can be a manageable task for a DIY enthusiast.
Vegetation growing on the wall can damage the stones and weaken the structure. Remove any moss, ivy, or other plants growing on the wall.
Missing or damaged stones should be replaced as soon as possible to prevent further damage. Re-pack any loose hearting to maintain the wall’s stability.
Ensure that the drainage around the wall is functioning properly to prevent water from accumulating behind the wall. Monitor the wall for signs of frost damage, such as cracking or spalling.
If you notice any frost damage, repair it promptly to prevent it from worsening. Regularly inspect the wall for signs of animal activity, such as burrowing or nesting.
Take steps to prevent animals from damaging the wall. If a section of the wall becomes unstable, it may be necessary to dismantle and rebuild it.
This is a time-consuming task, but it is essential for ensuring the wall’s long-term stability. When rebuilding a section of the wall, be sure to follow the same principles and techniques used in the original construction.
With proper maintenance, your dry stone wall will last for generations, adding beauty and value to your property.
Dry Stone Walling Techniques for Different Climates
The specific techniques used in dry stone wall construction may need to be adapted depending on the climate. In areas with heavy rainfall, it is especially important to ensure proper drainage to prevent water from accumulating behind the wall.
This can be achieved by incorporating drainage channels or weep holes into the wall’s design. In colder climates, frost heave can be a major concern, so it is important to build the foundation below the frost line.
Using frost-resistant stone can also help to prevent damage from freeze-thaw cycles. In hot, dry climates, consider using lighter-colored stones that reflect sunlight and prevent the wall from overheating.
Additionally, planting drought-tolerant vegetation around the wall can help to cool the surrounding area. Understanding the specific challenges posed by your local climate is essential for building a durable and long-lasting dry stone wall.
In areas with frequent freeze-thaw cycles, it’s important to use stones that are resistant to cracking and spalling. Choose stones with a low water absorption rate to minimize the risk of frost damage.
In windy areas, build the wall with a wider base and a lower profile to increase its stability. Use larger stones for the coping to prevent them from being dislodged by the wind.
In areas with heavy snow, design the wall to withstand the weight of the snow. Build the wall with a strong foundation and a solid core.
In coastal areas, use stones that are resistant to salt spray and erosion. Choose stones that are durable and weather-resistant.
In areas with seismic activity, build the wall with a flexible design that can withstand ground movement. Use smaller stones and pack the hearting loosely to allow for movement.
In areas with extreme temperatures, choose stones that can withstand thermal expansion and contraction. Use lighter-colored stones in hot climates and darker-colored stones in cold climates.
By adapting your dry stone walling techniques to the specific climate conditions in your area, you can build a wall that is both durable and beautiful.
The Art of Stone Selection and Placement
While technical skill is important, dry stone wall construction is also an art form. The way you select and place each stone can have a significant impact on the wall’s overall appearance and character.
Consider the natural shapes and textures of the stones, and try to create a harmonious balance. Some stone masons prefer to work with stones that are all of a similar color and texture, while others enjoy mixing different types of stone to create a more varied look.
Pay attention to the lines and patterns created by the stones, and use them to guide your placement. A well-built dry stone wall should have a sense of rhythm and flow, with each stone contributing to the overall composition.
Don’t be afraid to experiment and try different arrangements until you find something that feels right. With practice and a keen eye, you can create a dry stone wall that is not only functional but also a work of art.
The size, shape, and color of the stones can all contribute to the wall’s overall aesthetic. Use larger stones to create a sense of stability and strength.
Use smaller stones to fill gaps and create a more intricate pattern. The texture of the stones can also add visual interest.
Choose stones with a variety of textures to create a more dynamic look. The way you arrange the stones can also affect the wall’s appearance.
Create a pattern by alternating different sizes or colors of stones. Consider the overall composition of the wall when placing each stone.
Try to create a sense of balance and harmony. Don’t be afraid to break the rules and experiment with different arrangements.
The most important thing is to create a wall that you are proud of. A well-built dry stone wall is a testament to the skill and artistry of the builder.
It’s a structure that will last for generations, adding beauty and character to your property.
Conclusion
Dry stone wall construction is a rewarding and sustainable way to build walls. It requires patience, skill, and an appreciation for the natural beauty of stone.
By following the techniques outlined in this guide, you can create a dry stone wall that will last for generations, adding character and value to your property. Embrace the challenge, and enjoy the process of working with stone to create something truly special.
The knowledge and skills you gain from building a dry stone wall can be applied to other construction projects. You’ll develop a deeper understanding of the properties of stone and how to work with natural materials.
The satisfaction of creating something beautiful and durable with your own hands is immense. A dry stone wall is not just a structure; it’s a work of art.
It’s a legacy that you can leave for future generations. So, gather your stones, learn the techniques, and embark on the journey of dry stone wall construction.
You’ll be amazed at what you can create.