Granite countertops are a beautiful and durable addition to any kitchen or bathroom. However, even with their resilience, they are not immune to damage. Accidents happen, and sometimes those accidents result in chips or cracks that can detract from the overall appearance of your countertop.
Fortunately, you don’t always need a professional to restore your granite to its former glory. With the right materials and techniques, DIY granite countertop repair is achievable, saving you money and giving you the satisfaction of a job well done.
This guide will walk you through the process of repairing chips and cracks in your granite countertop, providing step-by-step instructions and helpful tips along the way. We’ll cover everything from assessing the damage to preventing future mishaps, ensuring your granite remains a stunning focal point in your home for years to come.
Assessing the Damage to Your Granite Countertop
Before you start any repair work, it’s essential to carefully assess the extent of the damage. This will help you determine the best approach and ensure you have the right materials on hand. Look closely at the chip or crack to understand its size, depth, and location.
Is it a small chip along the edge, a hairline crack in the middle of the countertop, or a larger, more significant break? Take note of whether the damage is isolated or if there are multiple chips or cracks in the same area. This will influence the amount of epoxy repair or stone filler you need and the overall time required for the granite countertop repair.
Also, consider the type of granite you have, as this can affect the color and texture of the repair materials you’ll need. Different types of granite have varying patterns and mineral compositions, so it’s crucial to match the repair product as closely as possible. If you’re unsure about the type of granite, consult your original purchase documents or contact the manufacturer for more information.
Finally, evaluate the surrounding area for any signs of weakness or instability. If the countertop feels loose or wobbly, there may be underlying structural issues that need to be addressed before proceeding with the repair. In such cases, it’s best to consult a professional to ensure the countertop is properly supported and secure.
Gathering the Necessary Repair Materials
Once you’ve assessed the damage, it’s time to gather the necessary materials for the granite countertop repair. Having everything on hand before you start will make the process smoother and more efficient. Here’s a list of essential items you’ll need.
First, you’ll need a granite repair kit, which typically includes epoxy or stone filler specifically designed for granite. Choose a kit that matches the color and texture of your countertop as closely as possible. Some kits also include color pigments that you can mix to achieve a perfect match.
In addition to the repair kit, you’ll need rubbing alcohol or acetone for cleaning the damaged area. You’ll also need a mixing stick or small spatula for combining the epoxy or stone filler. A razor blade or putty knife will help with applying the repair material smoothly and evenly.
For sanding and polishing, you’ll need a set of sandpaper with varying grits, ranging from coarse to fine. A polishing compound specifically designed for granite is crucial. Soft cloths or sponges will be useful for applying the polishing compound and buffing the repaired area.
Cleaning and Preparing the Damaged Area
Before you can begin the repair, it’s crucial to thoroughly clean and prepare the damaged area. This will ensure that the epoxy or stone filler adheres properly and creates a strong, seamless bond. Start by removing any loose debris or dirt from the chip or crack using a soft brush or vacuum cleaner.
Next, use rubbing alcohol or acetone to clean the area, removing any grease, oil, or residue that could interfere with the adhesion of the repair material. Apply the cleaning solution to a clean cloth and gently wipe the damaged area, ensuring it’s completely dry before proceeding.
| Material | Purpose | Notes |
|---|---|---|
| Rubbing Alcohol or Acetone | Cleaning | Removes grease and residue. |
| Soft Brush or Vacuum | Debris Removal | Cleans loose particles. |
| Painter’s Tape | Protection | Masks surrounding granite. |
| Razor Blade or Putty Knife | Application | Spreads filler evenly. |
To protect the surrounding granite from accidental scratches or damage, apply painter’s tape around the damaged area. This will create a clean boundary and prevent the repair material from spreading onto the surrounding surface. Make sure the tape is securely in place and covers all areas you want to protect.
If the chip or crack is deep, you may need to use a razor blade or putty knife to remove any loose or jagged edges. Gently scrape away any unstable fragments to create a smooth, even surface for the repair material to adhere to. Take your time and be careful not to damage the surrounding granite.
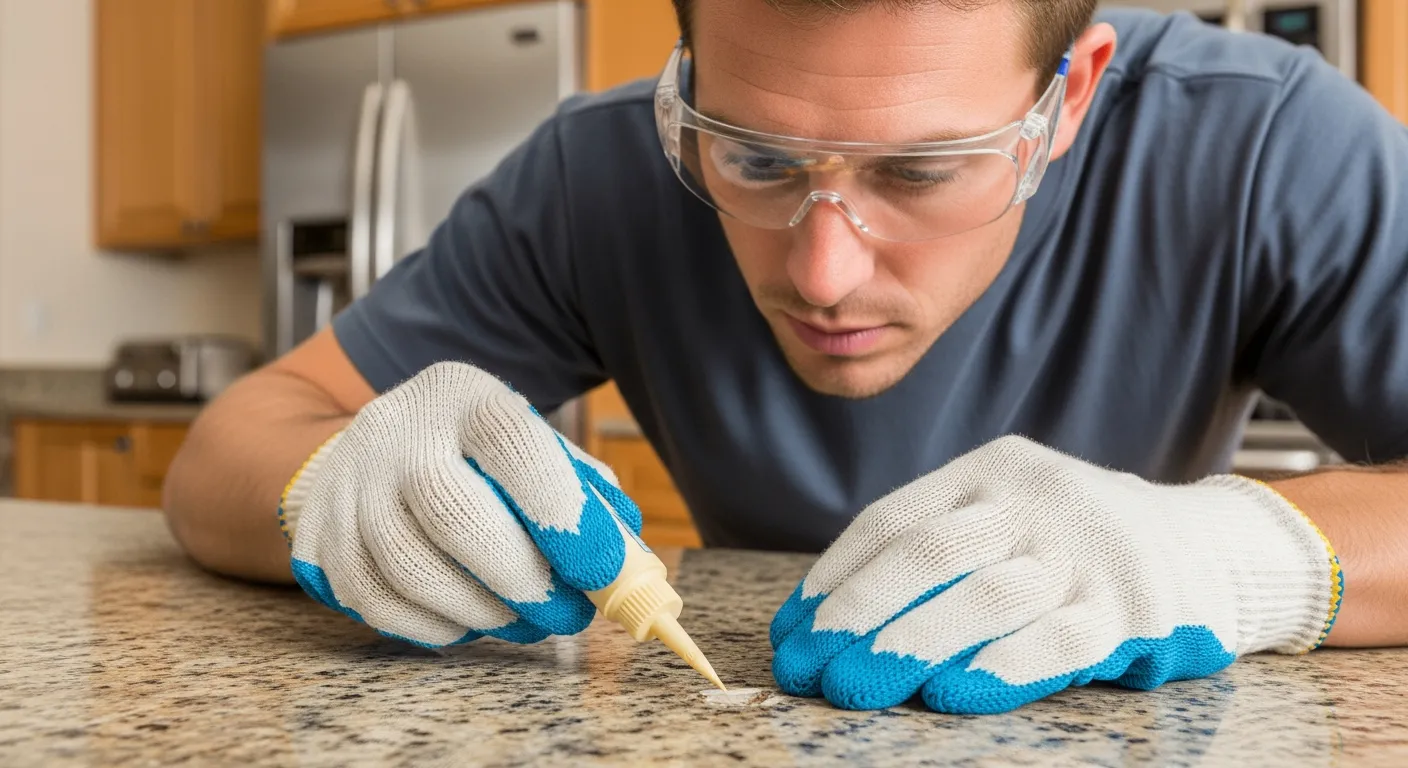
Applying Epoxy or Stone Filler
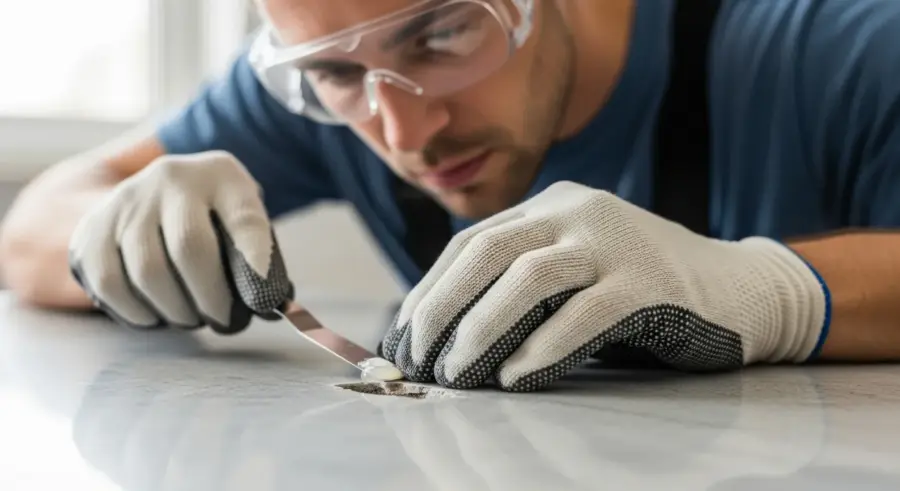
With the damaged area thoroughly cleaned and prepared, you’re ready to apply the epoxy or stone filler. Follow the instructions provided with your repair kit carefully, as the mixing ratios and application techniques may vary depending on the product. Start by mixing the epoxy or stone filler according to the manufacturer’s instructions.
Use a mixing stick or small spatula to thoroughly combine the components, ensuring there are no lumps or streaks. If your kit includes color pigments, add them gradually, mixing until you achieve a color that closely matches your granite. It’s better to start with a small amount of pigment and add more as needed to avoid over-coloring the mixture.
Once the epoxy or stone filler is properly mixed, use a razor blade or putty knife to apply it to the chip or crack. Apply the material in thin, even layers, filling the damaged area completely. Overfill the area slightly, as the epoxy or stone filler may shrink as it dries.
Use the razor blade or putty knife to smooth the surface and remove any excess material. Ensure the repair material is flush with the surrounding granite, creating a seamless transition. If you’re repairing a crack, work the epoxy or stone filler into the crack, ensuring it’s completely filled.
Sanding and Polishing the Repaired Area
After the epoxy or stone filler has completely dried, it’s time to sand and polish the repaired area. This will blend the repair seamlessly with the surrounding granite and restore its natural shine. Start with a coarse-grit sandpaper, such as 400-grit, to remove any excess repair material and level the surface.
Gently sand the area in a circular motion, being careful not to scratch the surrounding granite. As you sand, gradually increase the grit of the sandpaper, moving to finer grits such as 600-grit, 800-grit, and 1000-grit. This will create a smooth, even surface and prepare it for polishing.
Once the surface is smooth, apply a polishing compound specifically designed for granite to a soft cloth or sponge. Gently rub the polishing compound onto the repaired area in a circular motion. Apply even pressure and continue polishing until the surface is shiny and reflective.
Use a clean, soft cloth to buff the area, removing any excess polishing compound and enhancing the shine. Inspect the repaired area closely to ensure it blends seamlessly with the surrounding granite. If necessary, repeat the sanding and polishing process to achieve the desired results.
Preventing Future Damage to Your Granite Countertop
Now that you’ve successfully repaired your granite countertop, it’s important to take steps to prevent future damage. Proper care and maintenance can extend the life of your countertop and keep it looking beautiful for years to come. One of the most important things you can do is to seal your granite countertop regularly.
Granite is a porous material, which means it can absorb liquids and stains if it’s not properly sealed. Apply a high-quality granite sealer every six to twelve months to protect your countertop from spills and stains. Be sure to follow the manufacturer’s instructions for application and drying time.
- Use cutting boards
- Avoid placing hot pans directly on the granite
- Clean spills immediately
- Use coasters under drinks
- Avoid harsh chemicals
In addition to sealing, it’s also important to use cutting boards when preparing food. Cutting directly on the granite can scratch the surface and dull your knives. Always use a cutting board to protect your countertop and your knives.
Avoid placing hot pans directly on the granite, as this can cause thermal shock and lead to cracking. Use trivets or hot pads to protect your countertop from heat damage. Wipe up spills immediately to prevent staining. Granite can absorb liquids if they’re left on the surface for too long, so it’s crucial to clean up spills as soon as they happen.
Regular Countertop Maintenance Tips
Maintaining your granite countertop goes beyond just repairs and preventing damage. Regular cleaning and care will keep it looking its best and extend its lifespan. For daily cleaning, use a mild dish soap and warm water.
Avoid using harsh chemicals, abrasive cleaners, or scouring pads, as these can damage the surface of the granite. Simply wipe the countertop with a soft cloth or sponge, then rinse with clean water and dry thoroughly. This will remove dirt, grime, and food residue, keeping your countertop clean and sanitary.
For tougher stains, you can use a poultice made from baking soda and water. Apply the poultice to the stain, cover it with plastic wrap, and let it sit overnight. The poultice will draw out the stain, leaving your countertop clean and fresh.
Avoid using acidic cleaners, such as vinegar or lemon juice, on your granite countertop. These can etch the surface and dull the finish. Stick to mild, pH-neutral cleaners to protect your investment and keep your granite looking its best.
When to Call a Professional for Granite Countertop Repair
While DIY granite countertop repair is possible for minor chips and cracks, there are situations where it’s best to call a professional. If the damage is extensive, such as a large crack or a significant break, it’s best to consult a professional for granite countertop repair. Attempting to repair major damage yourself could lead to further problems and potentially void any warranties.
If you’re not comfortable working with epoxy, stone filler, or power tools, it’s also wise to seek professional assistance. A professional will have the expertise and equipment to handle the repair safely and effectively. They can also ensure that the repair is done properly, preventing future issues and maintaining the integrity of your countertop.
If you’re unsure about the type of granite you have or the best repair materials to use, a professional can provide guidance and recommendations. They can assess the damage, identify the type of granite, and select the appropriate repair products for a seamless, long-lasting repair. This will save you time and ensure that the repair is done correctly.
Finally, if you notice any signs of structural instability, such as a loose or wobbly countertop, it’s crucial to consult a professional. This could indicate underlying issues that need to be addressed before proceeding with any repair work. Ignoring structural problems could lead to further damage and potentially dangerous situations.
Cost Considerations for DIY vs. Professional Repair
One of the main reasons homeowners choose to tackle granite countertop repair themselves is to save money. DIY repairs are typically much cheaper than hiring a professional, as you only need to pay for the materials. A granite repair kit can cost anywhere from $20 to $50, depending on the size and quality of the kit.
If you already have some of the necessary tools, such as sandpaper, polishing compound, and cloths, the cost can be even lower. However, it’s important to factor in the cost of your time and effort. DIY repairs can be time-consuming, especially if you’re not experienced.
Professional granite countertop repair can cost anywhere from $100 to $500 or more, depending on the extent of the damage and the location of the repair. While this may seem like a significant expense, it’s important to consider the benefits of hiring a professional. Professionals have the expertise and equipment to handle the repair quickly and effectively, saving you time and ensuring a high-quality result.
They can also provide warranties on their work, giving you peace of mind knowing that the repair is guaranteed. Ultimately, the decision of whether to DIY or hire a professional depends on your budget, skill level, and the extent of the damage. Weigh the costs and benefits carefully to make the best choice for your situation.
Conclusion
Repairing chips and cracks in your granite countertop doesn’t have to be a daunting task. With the right tools, materials, and techniques, DIY granite countertop repair is achievable for most homeowners. Remember to assess the damage carefully, gather the necessary supplies, and follow the instructions provided with your repair kit.
Take your time and be patient, and you’ll be amazed at the results you can achieve. And don’t forget to take steps to prevent future damage, such as sealing your countertop regularly and using cutting boards and trivets.
By following the tips and guidelines in this article, you can keep your granite countertop looking beautiful for years to come. However, if you’re not comfortable with DIY repairs or the damage is extensive, don’t hesitate to call a professional. They can provide expert assistance and ensure that your countertop is restored to its former glory.
Whether you choose to DIY or hire a professional, taking care of your granite countertop is an investment in your home’s beauty and value. So, take the time to repair any chips or cracks and maintain your countertop properly. Your granite will reward you with years of elegance and durability.