Stone structures, whether historic monuments or modern buildings, inevitably face damage over time. Weathering, pollution, and physical impacts can all contribute to the deterioration of stone. Stone patching methods offer a way to address these issues, restoring the integrity and appearance of damaged stone surfaces.
This article explores the various techniques involved in stone patching, focusing on selecting appropriate materials and executing effective repairs. From understanding the types of damage to mastering the application of stone repair compounds, this guide provides valuable insights for both professionals and DIY enthusiasts.
We will cover everything from assessing the initial damage and choosing the right patching material to the final sculpting and curing processes. With careful planning and execution, stone patching can preserve the beauty and longevity of stone structures for generations to come.
Assessing Stone Damage and Determining Patching Needs
Before beginning any stone patching project, a thorough assessment of the damage is essential. This involves identifying the type and extent of the deterioration affecting the stone. Understanding the root cause of the damage is also crucial to prevent future issues.
Common types of stone damage include cracking, spalling, erosion, and biological growth. Cracking can occur due to structural movement, freeze-thaw cycles, or impact. Spalling, the flaking or peeling of the stone surface, is often caused by moisture trapped within the stone.
Erosion, on the other hand, results from the gradual wearing away of the stone due to wind, rain, or chemical pollutants. Biological growth, such as moss or lichen, can trap moisture and accelerate the deterioration process. Each type of damage requires a specific approach to patching and repair.
When assessing the damage, consider the overall structural integrity of the stone element. Minor surface imperfections may only require cosmetic patching, while more severe damage may necessitate structural repairs. Determine if the damage is localized or widespread, as this will affect the amount of patching material needed.
A critical part of the assessment also includes documenting the existing conditions. Taking photographs before, during, and after the patching process is highly recommended. These images serve as a valuable record of the work performed and can be useful for future reference.

Furthermore, consider the historical significance of the stone structure. If the structure is a designated landmark or has historical value, consult with preservation experts before undertaking any repair work. They can provide guidance on appropriate patching techniques and materials that will maintain the historical integrity of the building.
It’s also important to investigate the source of the damage to prevent recurrence. For example, if water infiltration is causing the damage, addressing the underlying issue, such as a leaky roof or faulty drainage system, is crucial. Ignoring the root cause will only lead to further deterioration and necessitate more extensive repairs in the future.
Finally, remember to consider the environmental factors that may be contributing to the damage. Exposure to harsh weather conditions, such as extreme temperatures, high humidity, or salt spray, can accelerate the deterioration of stone. Implementing protective measures, such as applying a water repellent or installing a drainage system, can help mitigate these environmental effects.
Choosing the Right Patching Material: Mortar vs. Resin
Selecting the appropriate patching material is a critical decision in any stone repair project. The choice typically comes down to mortar-based compounds or resin-based systems, each with distinct advantages and disadvantages. Mortar-based patches are generally preferred for larger repairs and situations where breathability is essential.
Resin-based systems, on the other hand, offer superior adhesion and are often used for smaller, more detailed repairs. Mortar-based patching compounds are composed of cement, lime, and aggregates, similar to the original mortar used in the stone structure. This compatibility helps ensure a seamless integration with the existing stone.
Mortar patches allow moisture to pass through, preventing the build-up of water pressure within the stone. This breathability is particularly important in historic structures where moisture management is crucial. Resin-based stone repair compounds, typically epoxy or acrylic-based, provide a strong and durable bond.
They are less permeable than mortar, which can be advantageous in certain situations, such as preventing water infiltration in vulnerable areas. However, the lack of breathability can also lead to moisture-related problems if not carefully considered. When choosing between mortar and resin, consider the type of stone, the extent of the damage, and the environmental conditions.
Consider the specific type of stone you are working with when selecting a patching material. Some stones, such as limestone and sandstone, are more porous and require a breathable mortar-based patch. Other stones, like granite and marble, are denser and may be suitable for resin-based patches.
Also, evaluate the size and depth of the damaged area. Mortar-based patches are generally better suited for larger repairs, as they can be applied in thicker layers without cracking. Resin-based patches are ideal for smaller, more intricate repairs, where precision and adhesion are paramount.
Think about the environmental conditions to which the patched area will be exposed. If the area is subject to frequent freeze-thaw cycles, a breathable mortar-based patch is recommended to prevent moisture from becoming trapped within the stone. In areas with high levels of pollution, a resin-based patch may offer better resistance to chemical attack.
Finally, consult with a stone repair specialist or experienced mason to get their expert opinion on the best patching material for your specific project. They can assess the damage, evaluate the stone type, and recommend the most appropriate solution based on their knowledge and experience. Their insights can save you time, money, and potential headaches in the long run.
Comparing Mortar and Resin Patching Materials
Both mortar and resin offer unique properties that make them suitable for different stone repair applications. Understanding these properties is key to selecting the best material for your specific project. Let’s examine the key differences between these two stone patching methods.
Mortar is a traditional material known for its breathability, while resin excels in adhesion and durability. The choice depends on the specific needs of the stone and the type of damage being addressed.
| Feature | Mortar | Resin |
|---|---|---|
| Breathability | High | Low |
| Adhesion | Moderate | High |
| Durability | Moderate | High |
| Application | Larger repairs, historic structures | Smaller repairs, detailed work |
| Cost | Lower | Higher |
| Compatibility | Excellent with traditional stone | Requires careful selection for compatibility |
Beyond the table, consider the workability of each material. Mortar is generally easier to work with, especially for those with less experience. It can be shaped and sculpted more readily, allowing for a more natural-looking repair.
Resin, on the other hand, can be more challenging to apply and shape. It tends to set quickly, requiring a more skilled hand to achieve the desired results. However, its rapid curing time can be an advantage in certain situations, allowing for faster completion of the repair.
Another important factor to consider is the long-term performance of each material. Mortar, while breathable, may be more susceptible to weathering and erosion over time. It may require periodic maintenance and reapplication to maintain its integrity.
Resin, with its superior durability, is generally more resistant to weathering and erosion. It can provide a longer-lasting repair, reducing the need for frequent maintenance. However, if the resin patch fails, it can be more difficult to remove and repair than a mortar patch.
Think about the aesthetic considerations as well. Mortar, with its natural appearance, can blend seamlessly with the surrounding stone. It can be tinted to match the color and texture of the original stone, creating a more harmonious repair.
Resin, while available in various colors, may not always perfectly match the surrounding stone. Its glossy finish can also make it stand out, especially on older, weathered stone surfaces. Careful attention to color matching and surface texturing is essential when using resin-based patches.
Preparing the Stone Surface for Patching
Proper preparation of the stone surface is paramount to ensure a successful and long-lasting patch. This involves cleaning the area, removing loose or deteriorated material, and creating a sound substrate for the patching compound to adhere to. Begin by thoroughly cleaning the stone surface to remove any dirt, dust, algae, or other contaminants.
Use a stiff brush and a mild detergent solution to scrub the area, followed by a clean water rinse. For stubborn stains or biological growth, consider using a specialized stone cleaner or biocide, following the manufacturer’s instructions. Next, carefully remove any loose or deteriorated stone material from the damaged area.
Use a chisel, scraper, or wire brush to gently remove any flaking, crumbling, or unsound stone. Take care not to damage the surrounding sound stone during this process. The goal is to create a clean, stable surface with a slightly rough texture to promote adhesion of the patching compound.
Once the loose material has been removed, inspect the area for any cracks or voids that need to be addressed. Small cracks can be filled with a fine crack filler or grout before applying the main patching compound. Larger voids may require additional support or reinforcement before patching.
After cleaning and removing loose material, consider consolidating the surrounding stone. This involves applying a consolidant, a liquid material that penetrates the stone and strengthens its structure. Consolidation is particularly important for fragile or deteriorated stone, as it helps to prevent further damage and provides a more stable base for the patch.
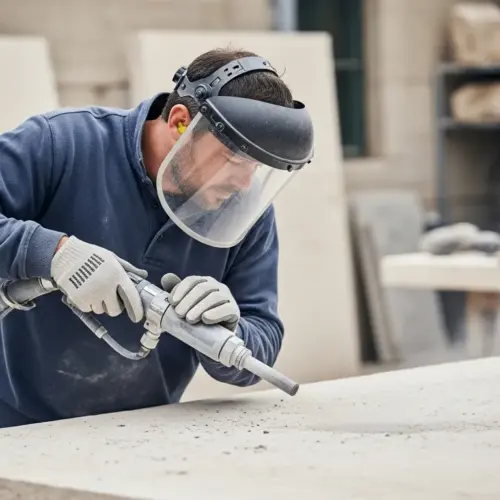
When removing loose material, use appropriate safety gear, such as safety glasses, gloves, and a dust mask. Stone dust can be harmful to your health, so it’s important to protect yourself from exposure. Work in a well-ventilated area to minimize dust inhalation.
If the damaged area is deep or extensive, consider creating a mechanical key for the patching compound. This involves cutting small grooves or indentations into the surrounding stone to provide a better grip for the patch. The mechanical key helps to prevent the patch from detaching or cracking over time.
Before applying the patching compound, dampen the prepared stone surface with clean water. This helps to prevent the stone from drawing moisture out of the patching compound, which can lead to cracking or poor adhesion. However, avoid over-wetting the surface, as this can weaken the bond between the patch and the stone.
Mixing and Applying Patching Compounds
The proper mixing and application of patching compounds are crucial steps in achieving a durable and aesthetically pleasing stone repair. Follow the manufacturer’s instructions carefully when mixing the patching material. Mortar-based compounds typically require mixing with water to achieve a workable consistency.
Resin-based systems often involve combining two or more components, such as a resin and a hardener. Use clean mixing containers and tools to avoid contamination, and mix only the amount of material that can be used within the working time specified by the manufacturer. Overmixing can introduce air bubbles, while undermixing can result in a weak or uneven patch.
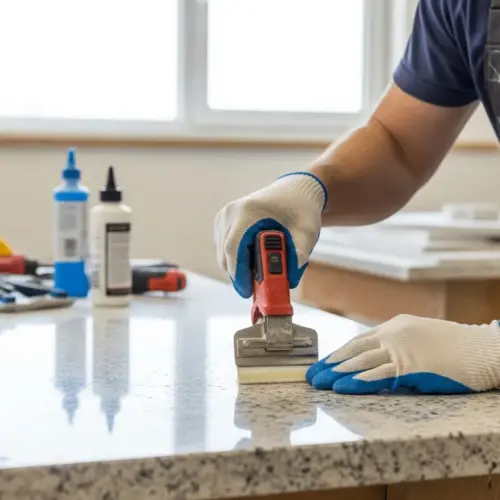
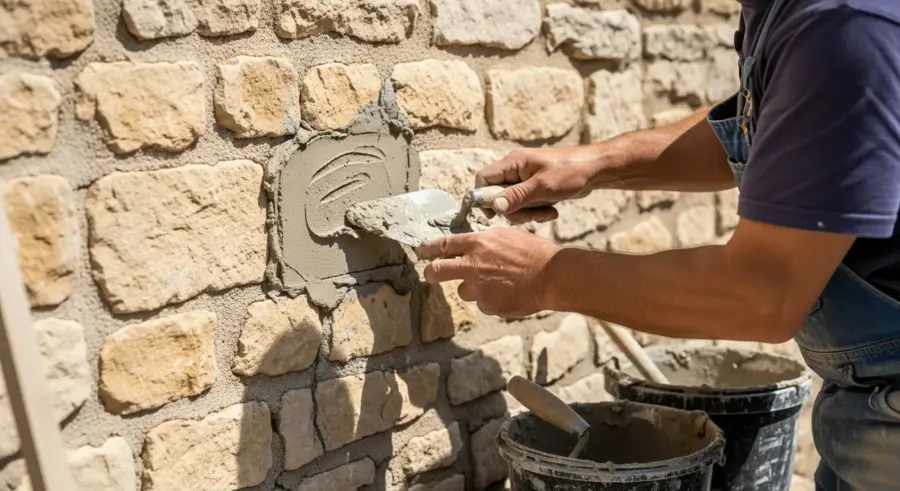
When applying the patching compound, use a trowel, putty knife, or other appropriate tool to pack the material firmly into the prepared area. Ensure that the compound fills all cracks, voids, and irregularities in the stone surface. Apply the material in thin layers, allowing each layer to partially set before applying the next.
This helps prevent shrinkage and cracking as the patch cures. Overfill the patch slightly to allow for subsequent sculpting and finishing. For larger repairs, consider using formwork or molds to support the patching compound while it cures.
When mixing mortar-based compounds, use potable water that is free from impurities. Avoid using water that is too hot or too cold, as this can affect the setting time and strength of the mortar. Gradually add water to the dry ingredients, mixing thoroughly until a smooth, workable consistency is achieved.
When mixing resin-based systems, carefully measure the components according to the manufacturer’s instructions. Use a clean, calibrated measuring device to ensure accurate proportions. Thoroughly mix the components until a uniform color and consistency are achieved.
When applying the patching compound, work in a consistent direction to avoid creating stress points in the patch. Use a firm, even pressure to pack the material into the prepared area. Avoid trapping air bubbles within the patch, as this can weaken its structure.
For larger repairs, consider using reinforcement, such as stainless steel pins or mesh, to provide additional support. Embed the reinforcement within the patching compound, ensuring that it is fully encapsulated. The reinforcement helps to distribute stress and prevent cracking in the patch.
Sculpting and Finishing the Patch
Once the patching compound has partially set, the next step is to sculpt and finish the patch to match the surrounding stone. This involves removing excess material, shaping the patch to the desired profile, and texturing the surface to blend seamlessly with the existing stone. Use a variety of tools, such as chisels, rasps, and sandpaper, to sculpt the patch.
Start by removing any excess material that extends beyond the original stone surface. Gradually refine the shape of the patch, paying close attention to the surrounding contours and details. The goal is to create a smooth transition between the patch and the original stone, minimizing any visible edges or discontinuities.
- Use appropriate safety gear
- Remove excess patching material
- Shape the patch to match the stone
- Texture the surface for blending
- Allow patch to fully cure
When sculpting the patch, use a light touch to avoid damaging the surrounding stone. Work gradually, removing small amounts of material at a time. Regularly compare the patch to the surrounding stone to ensure that it is blending seamlessly.
To create a natural-looking texture, use a variety of tools and techniques. Experiment with different chisels, rasps, and sandpaper grits to achieve the desired effect. Consider replicating the texture of the surrounding stone by using a rubbing stone or a texture mat.
For larger patches, consider creating a mock-up of the finished surface. This allows you to experiment with different sculpting and texturing techniques before working on the actual patch. The mock-up can also serve as a reference for the final finish.
If the surrounding stone has a patina, consider replicating it on the patch. This can be achieved by applying a stain or dye to the surface of the patch. Experiment with different colors and application techniques to achieve a close match.
After sculpting and texturing the patch, allow it to fully cure before applying any protective coatings or sealants. The curing time will vary depending on the type of patching compound used. Follow the manufacturer’s instructions for best results.
Matching Stone Color
Achieving a seamless blend between the patch and the original stone often requires careful attention to color matching. Stone color can vary significantly depending on the type of stone, its age, and its exposure to the elements. Start by observing the overall color and tone of the surrounding stone.
Note any variations in color due to weathering, staining, or mineral deposits. If possible, obtain a sample of the original stone to use as a reference for color matching. This will help ensure that the patching compound is tinted to the correct shade. Many patching compound manufacturers offer a range of pigments or colorants that can be added to the material to achieve the desired color.
Start by adding small amounts of pigment and mixing thoroughly until the color closely matches the stone sample. It’s always better to err on the side of a slightly lighter shade, as the patch will often darken slightly as it cures. Apply a small amount of the tinted patching compound to an inconspicuous area of the stone to test the color match.
Allow the test patch to dry completely before evaluating the color. If the color is not a perfect match, adjust the pigment accordingly and repeat the testing process until a satisfactory result is achieved. Consider the texture of the stone when matching the color, as a rougher surface will appear darker than a smooth surface of the same color.
Consider the lighting conditions when matching the color. The color of the stone may appear different under different lighting conditions, such as sunlight, shade, or artificial light. Evaluate the color match under the same lighting conditions that the patch will be exposed to in the long term.
If you are having difficulty matching the color, consider consulting with a professional color matching specialist. They have the expertise and equipment to accurately analyze the color of the stone and create a custom tint for the patching compound. Their services can be particularly valuable for complex or challenging color matches.
Remember that the color of the patch may change over time due to weathering and exposure to the elements. Consider using a UV-resistant pigment to help prevent fading or discoloration. Regularly inspect the patch and reapply the colorant as needed to maintain a consistent appearance.
When applying the colorant, use a fine brush or sponge to avoid creating streaks or blotches. Apply the colorant in thin, even layers, allowing each layer to dry before applying the next. Blend the colorant into the surrounding stone to create a seamless transition.
Curing and Protecting the Patched Area
Proper curing and protection of the patched area are essential for ensuring the long-term durability and performance of the repair. Curing refers to the process of maintaining adequate moisture and temperature levels to allow the patching compound to fully hydrate and harden. The specific curing requirements will vary depending on the type of patching material used.
Mortar-based compounds typically require a longer curing period than resin-based systems. Keep the patched area moist for several days following application to prevent the mortar from drying out too quickly. This can be achieved by covering the patch with plastic sheeting or damp burlap, or by misting it with water periodically.
Resin-based systems generally require less moisture during curing, but it’s still important to protect the patch from extreme temperatures and direct sunlight. Follow the manufacturer’s instructions regarding curing times and temperature ranges. Once the patching compound has fully cured, consider applying a protective coating or sealant to the repaired area.
This will help protect the patch from water damage, staining, and other environmental factors. Choose a coating or sealant that is compatible with the stone and the patching compound, and apply it according to the manufacturer’s instructions. Regular maintenance, such as cleaning and periodic reapplication of the protective coating, will help extend the life of the stone patch.
When curing mortar-based patches, avoid using excessive amounts of water, as this can weaken the mortar. Mist the patch lightly and frequently, rather than soaking it. Protect the patch from direct sunlight and wind, as this can cause it to dry out too quickly.
When curing resin-based patches, avoid exposing them to extreme temperatures or humidity. Follow the manufacturer’s instructions regarding temperature and humidity ranges. If necessary, use a heater or dehumidifier to maintain optimal curing conditions.
When selecting a protective coating or sealant, consider the type of stone and the environmental conditions. Choose a coating or sealant that is breathable, water-repellent, and UV-resistant. Apply the coating or sealant in thin, even layers, allowing each layer to dry before applying the next.
Regularly inspect the patched area for signs of damage or deterioration. Clean the patch regularly to remove dirt, dust, and other contaminants. Reapply the protective coating or sealant as needed to maintain its effectiveness.
Conclusion
Stone patching is a valuable technique for preserving and restoring the beauty and structural integrity of stone structures. By understanding the different types of stone damage, selecting appropriate patching materials, and following proper application and curing procedures, you can achieve durable and aesthetically pleasing repairs.
Whether you’re a professional stone mason or a DIY enthusiast, mastering the art of stone patching will allow you to maintain and enhance the timeless appeal of stone for generations to come. Remember to always prioritize safety, follow manufacturer’s instructions, and take your time to ensure a quality repair.
The information provided in this article is intended for general guidance only and should not be considered a substitute for professional advice. Always consult with a qualified stone repair specialist before undertaking any stone patching project. They can assess the specific conditions of your project and provide tailored recommendations.
With the right knowledge, skills, and materials, you can successfully repair damaged stone and preserve its beauty for years to come. Stone patching is a rewarding and fulfilling endeavor that allows you to contribute to the preservation of our cultural heritage.